オリジナルのtheme(テーマ)を作る07:投稿日時を表示させる

ここではtimeタグを使いますが、timeタグでなくてもいいです。

  1. <time>2016年03月27日 8:00AM</time>

これにテンプレートタグを入れます。

  1. <time><?php echo get_the_date(); ?> <?php the_time(); ?></time>

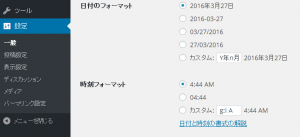
出力したときの表記の形式は設定画面で指定できます。
date

その他の書き方例

  1. <time><?php the_date('Y/m/d (D)'); ?> <?php the_time(); ?></time>

上記の書き方では、2016/03/27 (日) 3:55 AM という形で表示されます。
Y…4桁年、y…2桁年、m…0を付けた2桁月、d…0を付けた2桁日、D…省略曜日になります。
<?php the_date(); ?>を使用すれば、最新の記事だけ投稿した日を出力します。
一日に何度も投稿する場合は、こちらのほうがスッキリ見えるかもです。
時間の表記は
H…24時間表記で0を付けた2桁時、h…12時間表記で0を付けた2桁時、i…0を付けた2桁分、s…0を付けた2桁秒になります。

出力方法は他にもいろいろとありますが、ひとまずこんなとこで。

オリジナルのtheme(テーマ)を作る06:見た目を少し整える

記事タイトルと本文を表示できたので、ちょっと見た目を整えてみようー。
style.cssをいじります。
これはお好みで自由に書き加えていただければ良いかなと思います。
bootstrapを使っているので、たとえば、header内のnavbarをいじってみたりする感じです。

適当すぎてアレですが(^_^;)
これで完成というわけではないのですが、、このサイト用に作ったcssのheader部分です。
bootstrapがbootstrapぽくならないようにしたつもり。(笑)
ただし、このままでは使えないのでメニュー作るときにやり直し。

  1. /* #header
  2. ----------------------------*/
  3. #header {
  4. }
  5. #header .navbar {
  6. margin-bottom: 0;
  7. border: none;
  8. border-radius: 0;
  9. }
  10. #header .navbar-inverse {
  11. background-color: #000;
  12. border-color: transparent;
  13. }
  14. #header h1 small {
  15. display: block;
  16. position: absolute;
  17. font-size: 11px;
  18. bottom: 0;
  19. left: 50px;
  20. }
  21. #header h1 {
  22. padding-left: 50px;
  23. margin: 0;
  24. font-family: 'Play', sans-serif;
  25. height: 42px;
  26. }
  27. #header h1:before {
  28. content: url(../img/logomark_s.png);
  29. display: block;
  30. position: absolute;
  31. width: 42px;
  32. height: 42px;
  33. top: 0;
  34. left: 0;
  35. }
  36. #header .navbar-brand {
  37. color: #FF7F00;
  38. font-size: 25px;
  39. padding: 0 15px;
  40. height: auto;
  41. }
  42. #header .navbar-brand span:nth-child(n+9) {
  43. color: #FFF;
  44. }
  45. #header .navbar-collapse {
  46. margin-top: 20px;
  47. }
  48. #header .navbar .nav>li>a {
  49. color: #FFF;
  50. height: 100px;
  51. border-left: 1px #AAA solid;
  52. padding: 25px;
  53. }
  54. #header .navbar .nav>li:last-child>a {
  55. border-right: 1px #AAA solid;
  56. }
  57. #header .navbar .nav>li>a small {
  58. display: block;
  59. font-size: 11px;
  60. color: #777;
  61. font-family: 'Play', sans-serif;
  62. text-align: center;
  63. }
  64. #header .container>.navbar-collapse,
  65. #header .container>.navbar-header {
  66. background-color: #000;
  67. }
  68. #header .nav>li>a:focus,
  69. #header .nav>li>a:hover {
  70. background-color: #000;
  71. }
  72. #header .navbar-toggle {
  73. padding: 0 5px;
  74. margin-bottom: 0;
  75. border-color: transparent;
  76. }
  77. @media screen and (min-width: 1200px){
  78. #header .navbar {
  79. padding-top: 70px;
  80. height: 190px;
  81. }
  82. }
  83. @media screen and (min-width: 768px) and (max-width: 1199px){
  84. #header .navbar {
  85. padding-top: 0;
  86. height: auto;
  87. }
  88. #header h1 {
  89. margin-top: 7px;
  90. margin-bottom: 7px;
  91. }
  92. #header .navbar .nav>li>a {
  93. height: auto;
  94. padding: 10px 15px;
  95. }
  96. }
  97. @media screen and (max-width: 767px){
  98. #header {
  99. min-height: 58px;
  100. }
  101. #header .navbar {
  102. padding: 0;
  103. min-height: 58px;
  104. }
  105. #header .navbar-collapse {
  106. margin-top: 0;
  107. }
  108. #header .navbar .nav>li>a {
  109. height: auto;
  110. border-left: none;
  111. border-bottom: 1px solid #AAA;
  112. padding: 10px 15px;
  113. }
  114. #header .navbar .nav>li:last-child>a {
  115. border-right: none;
  116. }
  117. #header .navbar .nav>li {
  118. -webkit-box-shadow: inset -1px -1px 0px 0px rgba(0,0,0,1);
  119. -moz-box-shadow: inset -1px -1px 0px 0px rgba(0,0,0,1);
  120. box-shadow: inset -1px -1px 0px 0px rgba(0,0,0,1);
  121. }
  122. #header h1 {
  123. margin-top: 7px;
  124. margin-bottom: 7px;
  125. }
  126. #header h1 small {
  127. left: 65px;
  128. }
  129. #header h1:before {
  130. margin-left: 10px;
  131. }
  132. #header .navbar .nav>li>a small {
  133. display: inline-block;
  134. text-align: left;
  135. margin-left: 15px;
  136. }
  137. #header .navbar-toggle {
  138. z-index: 100;
  139. }
  140. #header .navbar-toggle {
  141. margin: 8px 10px 0 0;
  142. background-color: #999;
  143. color: #FCFAEB;
  144. }
  145. #header .navbar-toggle {
  146. padding: 10px;
  147. }
  148. #header .navbar-toggle:focus,
  149. #header .navbar-toggle:hover {
  150. background-color: #666;
  151. }
  152. }

オリジナルのtheme(テーマ)を作る05:記事を表示させる

メニューを後回しにしましたが(^_^;)
やっぱり記事を表示させないとですね・・

  1. <main id="main" role="main">
  2. <div class="container">
  3. <section>
  4. <div class="row">
  5. <div class="col-xs-12">
  6. <article>
  7. <h2><a href="#">記事のタイトル</a></h2>
  8. <p>記事の本文が入るよ</p>
  9. </article>
  10. <!--//article -->
  11. </div>
  12. <!--//col -->
  13. </div>
  14. <!--//row -->
  15. </section>
  16. <!--//section -->
  17. </div>
  18. <!--//container -->
  19. </main>
  20. <!--//#main -->

元のHTMLはこんな感じで
とりあえず記事とタイトルを表示させる場所を作りました的な。

これに、テンプレートタグを入れます。

  1. <main id="main" role="main">
  2. <div class="container">
  3. <section>
  4. <div class="row">
  5. <div class="col-xs-12">
  6. <?php if(have_posts()): while(have_posts()): the_post(); ?>
  7. <article>
  8. <h2><a href="<?php the_permalink(); ?>"><?php the_title(); ?></a></h2>
  9. <?php the_content(); ?>
  10. </article>
  11. <!--//article -->
  12. <?php endwhile; endif; ?>
  13. </div>
  14. <!--//col -->
  15. </div>
  16. <!--//row -->
  17. </section>
  18. </div>
  19. <!--//container -->
  20. </main>
  21. <!--//#main -->

ループ

  1. <?php if(have_posts()): while(have_posts()): the_post(); ?><?php endwhile; endif; ?>

記事一覧は「記事タイトル+記事本文」が並んでいますので
<?php if(have_posts()): while(have_posts()): the_post(); ?>から<?php endwhile; endif; ?>まで
という形で囲んで、それを繰り返して出力します。

  1. <?php the_permalink(); ?>

記事の個別ページのURLを出力します。

  1. <?php the_title(); ?>

記事のタイトルを出力します。

  1. <?php the_content(); ?>

記事の本文を出力します。
自動的に<p></p>が入るので、pタグで囲んだりする必要はありません。